At Kinetica we know our customers and partners want to deploy our engine in a variety of different configurations. To support them, we're excited to share our recent contributions to Docker Hub where we've made Kinetica images available. We're keeping these images updated and aligned with our latest releases to ensure our customers running Docker will have easy access to upgrades and new features.
Docker is leading the charge in containerized architecture and is the only platform to address every application across the hybrid cloud. Using Docker containers, enterprises can standardize and automate the way applications are built, managed, and secured across departments into lightweight, stand-alone, executable packages.
On Docker Hub you'll find three Kinetica builds:
- Kinetica-cuda80
- Kinetica-cuda91
- Kinetica-intel
The two CUDA builds should be used with GPU-enabled Kinetica instances and the Intel build should be used for instances with no GPUs, i.e. CPUs.
Getting started with Kinetica and Docker could not be easier. Let's run through a typical setup. There are two initial tasks we must complete in order to be able to use the GPUs in a Dockerized container. If you're already running GPU applications or code in Docker containers, you can most likely skip these steps.
The first prerequisite is that the NVIDIA drivers for your GPU are correctly installed on the container host as per Kinetica documentation which can be found here.
The second prerequisite is that you have the NVIDIA Docker container runtime available. Below is the example of how I set this up on my Centos 7 system:
yum-config-manager --add-repo
                         https://download.docker.com/linux/centos/docker-ce.repo
yum install docker-ce
distribution=$(. /etc/os-release;echo $ID$VERSION_ID)
curl -s -L https://nvidia.github.io/nvidia-docker/$distribution/nvidia-docker.repo |
sudo tee /etc/yum.repos.d/nvidia-docker.repo
yum install nvidia-docker2
yum install nvidia-container-runtime
Now we should be able to perform a simple test:
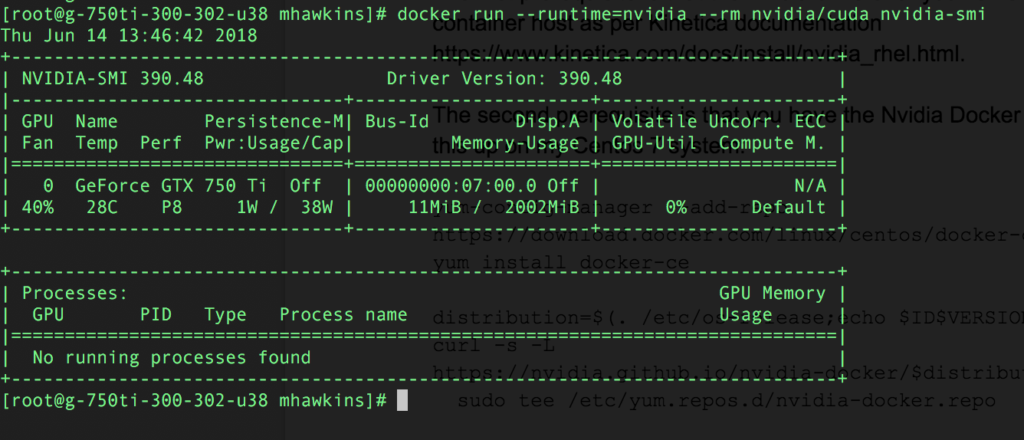
This shows us that a container will start and communicate with the GPU.
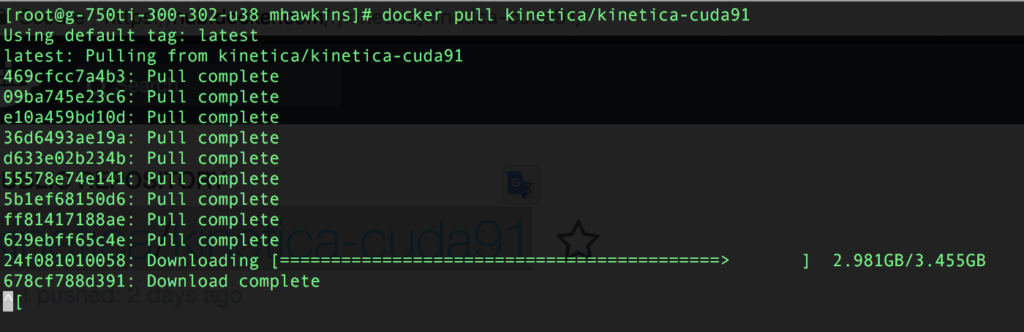
Now we can pull our Kinetica Docker image. In this example I will be using our latest CUDA 9.1 release:
Once the image is downloaded we can start our container:


For workloads that aren't transient, it's likely you'll want to save data to a mount point on the host. The command for this is:
docker run --privileged --rm --runtime=nvidia -p 8080:8080 -p 8088:8088 -p 9191:9191 -p 9292:9292
                    -v <host_side_persist_directory>:/opt/gpudb/persist kinetica/kinetica-cuda91:latest
Replace the placeholder in the command above (<host_side_persist_directory>) with an appropriate host location or mount point for data storage.
Once you have your container up and running, you can connect to port 8080 on the host and interact with the Kinetica cluster in the same way you would a non-Dockerized container.

And there you have it! You're all set up with the Kinetica Docker image.
We'll continue to update our images as subsequent versions of the Kinetica engine are released to ensure you always have the latest version to deploy. It's a priority at Kinetica that our customers are able to deploy our software in the way that best fits their business and IT needs. By working directly with a variety of innovative technology providers, we ensure that Kinetica will fit seamlessly into your ecosystem.
Interested in learning more about our other technology integrations? Check out this blog on our connector with StreamSets to see how their modern data pipeline tool can be combined with Kinetica to performantly and scalably manage extreme data movement across your organization.